Paper Craft: Tutorials: Rectangular Window Frames
In other tutorials we explore how to build complex wall openings such as beveled round window frames and beveled window frames of any type. In this tutorial we consider a much simpler topic: how to create a non-beveled rectangular window frame, which is easiest type of wall opening to build a frame for.
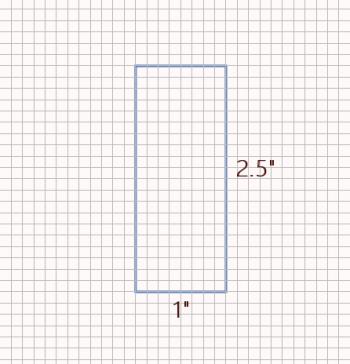
In order to make the instructions clear, steps will be accompanied by images based on a window which is eight squares wide and twenty squares tall. The depth (which is not shown) is 4 squares. In this case, the grid had 1/8" squares, which made the window 1" x 2.5" x 0.5". Throughout the tutorial I will refer to the size in units rather than inches; thus, we'll call the window dimensions 8 x 20 x 4 units.
Materials
- Card stock paper
- Pencil
- Scissors, paper trimmer, or craft knife
- PVA adhesive
Step One
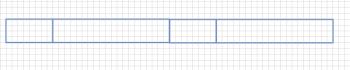
Measure the length (L), width (W) and depth (D) of your window opening. Using these numbers, draw a rectangle on card stock with dimensions D by (2L + 2W). Divide this rectangle into four smaller rectangles, each with depth D, and two with length L and two with length W. The L rectangles and the W rectangles should alternate. In the case of our example, L = 20, W = 8, D = 4. So we will create a rectangle of width 4 units, and length 56 units (20 * 2 + 8 * 2). This will be divided as shown below.
Step Two
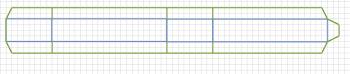
Extend the rectangle lengthwise in one direction, and widthwise in both directions. Make the extensions long enough that you can create a crease and add glue to the extensions. I usually aim for about 1/4". See the image below for an example. Note that you don't have to bevel the corners back as I've shown; that's a habit I've developed because sometimes that extra bit of cardstock can get in the way of a fold. I just always do it rather than trying to analyze whether I need to in a particular situation!
Step Three
Use your craft knife to score (without cutting through all the lines that are marked blue in the picture above. Then use your craft knife or scissors to cut all the green lines.
Step Four
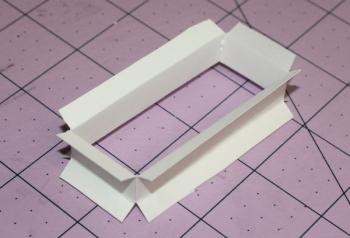
Fold backwards all the vertical blue lines, and fold foward all the horizontal ones. Note that it is often easier to fold all the creases away from your scoring, and then reverse the ones that need to fold forward. Turn the piece into a rectangular loop, and glue the tab shown on the right over the back of the opposite side to make the loop permanent.
Step Five
Carefully glue all the tabs on one side to one wall opening. You will probably want to do this one side at a time, holding each side in position until the glue sets, and then move on to the next one.
Step Six
Once you have affixed one wall, it's time to do the other. This is the most challenging part, but there are no real "tricks" to it; you just need to be careful and precise. If you have multiple openings, you need to glue all of them to one wall face, and then plan the order in which you affix them to the other face, so you don't get yourself into a situation where you can't lift the wall face to add glue.

