Paper Craft: Tutorials: Beveled Wall Openings
Creating wall openings that are larger on the outside face of the wall than on the inside face is a challenging task. Cutting the openings themselves is easy; creating the sill piece that connects the two openings is a larger challenge. After all, this opening is going to be made up of non-rectangular quadrilaterals (and depending on how your window is designed, the quadrilaterals may not even all be trapezoids).
I've tried several techniques, and have settled on one that works very well for me - and I even created a quadrilateral calculator to get this website to do the heavy lifting for me. In this tutorial, I'll use a window I'm creating for a medieval church model as an example. This window is particularly complex because it has some rounded edges, but if you can build a window like this, then you can do simpler windows as well.
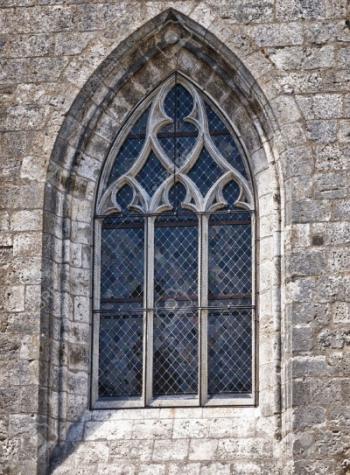
To get a sense for what we're going to build, consider the photograph shown here. Our window won't look exactly like this one, but it's similar.
Step One
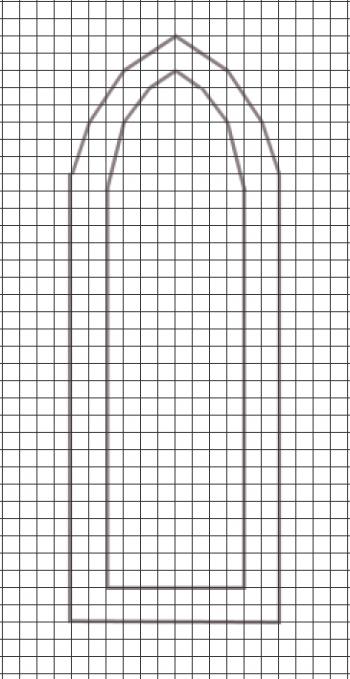
Draw your window shape, both the inner and outer openings, on a single sheet of graph paper (or on a gridded image in your graphics software). The larger opening should be outside, and the smaller opening inside, as shown in the image here.
Note that the openings do not have any curved edges; the curves have been broken down into a series of straight lines. If you closely approximate a curve, the end result will still look very smooth.
Step Two
This step is purely mathematical. You are going to place your design in a coordinate space. If that sounds intimidating, don't worry; I'll talk you through it, and once you've done it a couple times, it'll be a piece of cake for you.
In coordinate space, every point of space has three coordinates - an x-coordinate that specifies how far left-to-right the point lies, a y-coordinate that specifies how far up-to-down the point is, and a z-coordinate that specifies how deep the point lies in space (away from the viewer). Every point can be written like this: (x, y, z), where x, y, and z represent the respective coordinates.
In addition, we have to have an origin, which is a fancy way of saying there's one point that's our reference point, where the x, y, and z coordinates are all zero. The origin is the point we label (0, 0, 0).
We're going to use this system to label all the endpoints of the lines in our diagram. What we choose as our origin is entirely up to us, so I'm going to use my lower left, outer corner as the origin. I do this because it allows me to avoid negative coordinates, and I know some people reading this will get nervous about negative numbers.
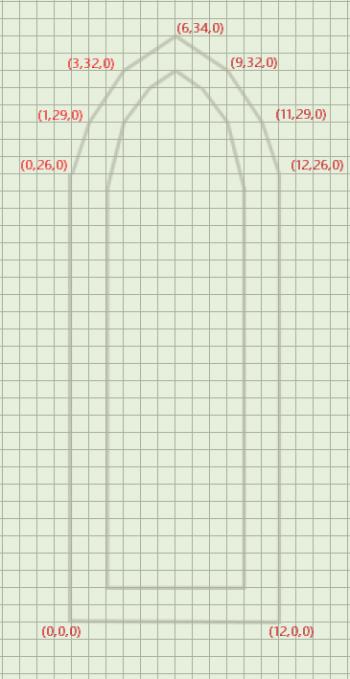
Now let's follow the outer bottom edge of the window. How many points to the right do we go from the origin to find that point? It's 12 units to the right, or +12 on the x-axis. Therefore, we can label this point (12, 0 , 0). From here, we go up 26 units, which puts us at (12, 26, 0). The next one is a little more tricky - we're moving one unit to the left (which we represent by subtracting 1 from our previous x-coordinate) and three more units up. So our next coordinate is (11, 29, 0). Continue on in this manner until you've gone all around the window. When you're done, compare your results with the image shown here, to make sure you've done it correctly.
At this point, all your points have had a z-coordinate of zero. This is because all your points are at the same depth. But now we need to do the inner edge of the opening, and since the wall has depth, we need to now how thick the wall is. That information can't be pulled from our drawing - you need to know how thick you intend to make your wall (what is the separation between the pieces of cardstock that form the inner and outer walls?). In this case, I chose a wall depth of 4 units. Therefore, for the inner edge, all the z-coordinates will be 4.
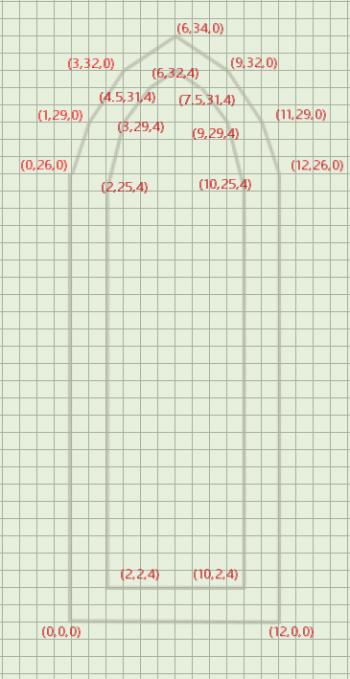
The first point is two units to the right and two units up (and four units deep) from the origin, so it is (2, 2, 4). Now we proceed around the edge as before. Pay close attention, because making a mistake at this stage will result in wasted work later on. The more you do this, the more you'll learn tricks to help keep yourself from making mistakes. For example, since my window is symmetric along the vertical center line, I know that the x-coordinates on opposite sides of that line have to have an average of 6 (the x-coordinate of the center line). If they don't, I know I've made a mistake. Similarly, the y-coordinates on opposite points have to match.
Once you've finished going around the inner edge, check your points against the picture shown here.
Step Three
You've now divided your window frame into a series of quadrilaterals (connect corresponding points on the inner and outer edges to see that you have created 9 quadrilaterals). Now head on over to the Quadrilateral Calculator page. You are going to enter the coordinates of each quadrilateral into the calculator. We'll begin with the bottom quadrilateral. Enter into the calculator the following four points: (0,0,0); (2, 2, 4); (10, 2, 4); (12, 0 , 0). Note that it doesn't matter which point you start with, and it doesn't matter whether you go clockwise or counter-clockwise around your quadrilateral, but you must enter them in sequence around the quadrilateral. When you click "Calculate" the calculator will tell you the side lengths of your quadrilateral, plus the lengths of the two diagonals:
AB = 4.898979485566356
BC = 8
CD = 4.898979485566356
DA = 12
AC = 10.954451150103322
BD = 10.954451150103322
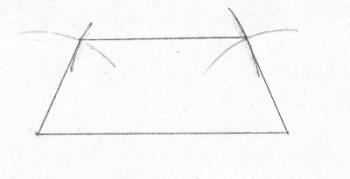
Now it's time to pull out a sheet of paper, a ruler, and a compass. I like to start with the longest side, so on my paper, I'll draw a line 12 units long (I'm going to use the 1/4" scale on my triangular scale, so this will result in a line 3" long).
Having done that, I'm going to use my compass to identify where the other two corners of my quadrilateral lie. I set the opening to 4.9 units and draw an arc, then I set it to 10.95 (actually, I'll round up to 11 units) and draw another arc. Where those arcs intersect is another vertex of the quadrilateral. Now you can draw the lines connecting the vertices. When you do, be sure to measure each length to make sure they match the numbers shown by the calculator. If they don't you've done something wrong! Your result should look something like the image shown below.
Now we're going to move on to the next quadrilateral, which is more complicated for a couple reasons. First, because it is not symmetrical like the first quadrilateral. Secondly because we have to place it properly in relation to the first quadrilateral. Because I have graphics software I can work with, I don't worry about proper placement now, knowing that I can rearrange things digitally. This is especially important because I've scaled my diagram up, so putting all the pieces in the proper position would make it too large to fit on the paper.
Once you start dealing with non-rectangular, non-trapezoidal pieces, it can get a bit confusing, so it is probably a good idea to label the points on your construction (A, B, C, and D) for each piece, so you don't make mistakes.
Your final result after doing five quadrilaterals (note that the other four are mirror images of the ones you've already done, so you don't need to reconstruct them if you have graphics software to work with) will look something like this:
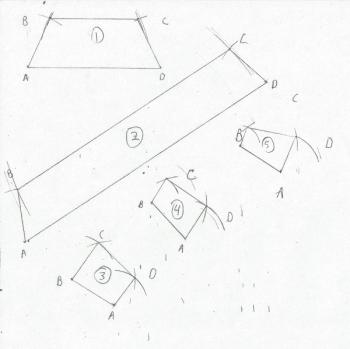
Notice that even though I didn't put my pieces end to end, I did roughly angle them so they would fit together with minimal rotation. I also numbered the quadrilaterals as I drew them, so I wouldn't get confused. I'll just tidy this all up in my graphics software. If you don't have graphics software, you did all these pieces to 100% scale, and end to end, so you just need to erase some lines, or use tracing paper or a light box to transfer a clean copy.
Step Four
After I've arranged my pieces I print it out, and then hand-draw the tabs that will attach the window frame to the two walls. These can be hand-drawn because they are not visible to the viewer; their purpose is only to be attached to the interior of the wall.
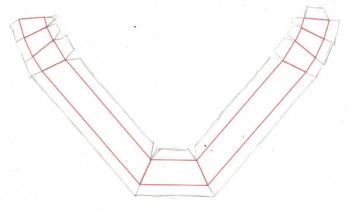
Now I cut out the outer outline, and then score the corners and edges of the frame so they can be folded to the proper shape. The tab on the top right folds the opposite direction from all the others, and attaches to the top left corner, creating with window shape.
Step Five
The final step, of course, is to attach the window frame. This is done in two phases. First attach one set of tabs to one wall. Once the tabs have dried, attach the other set of tabs to the other wall. This can be a tricky process, but the more accurately you've constructed your frame, the more easily it will go together. Be sure to glue the top tab before you begin attaching the frame to the walls; that tab helps hold the window frame's shape, which makes the gluing process much easier.
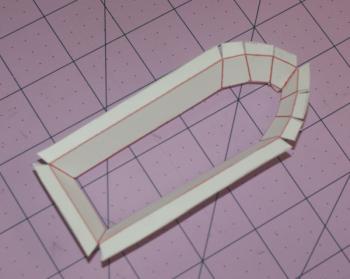
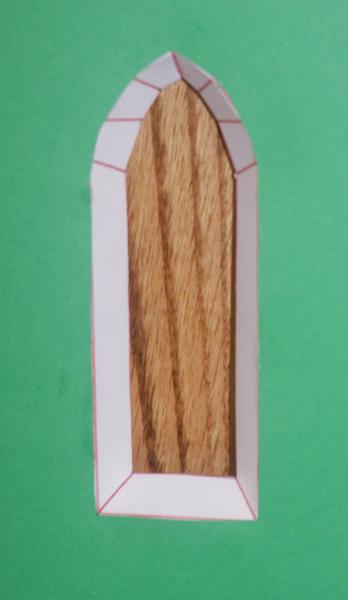
In the completed image here, I used green paper for the wall, and kept the bright red lines for the creases - this was done to increase contrast and make the project easier to visualize. In normal practice, I would use the same color paper all around, and either use very faint, thin gray lines, or plan on painting over the entire project.
Also, even though everything is drawn with straight lines, I tend to cut a best-fit curve, which will make the creases and corners stand out less.

