Paper Craft: Tutorials: Keyhole Corners
The Keyhole Corner is a corner joint which is designed to make temporary corners on a structure. It has both advantages and disadvantages relative to the temporary corners made with metal corner braces. The prime disadvantage is that it's not as simple and quick to build. Its advantage is that it makes a tighter fitting corner with less "wiggle room".
The keyhole corner consists of two parts. The first part is the keyhole, and the second part is the key. When the key slides into the keyhole, the two edges of the corner are solidly held together. If the key slides into the keyhole from above, gravity holds the joint in place so you don't need to worry about it falling apart.
Step One
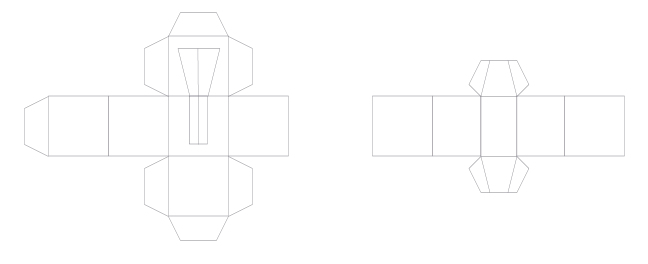
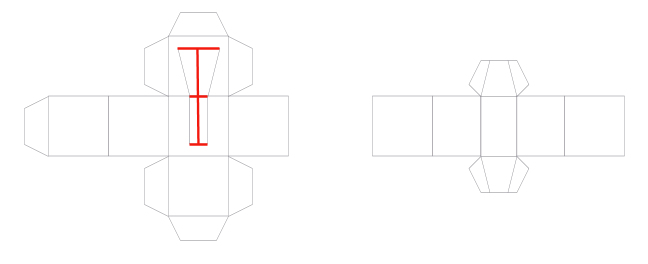
Cut out both shapes from the templates above. Use the redline template to identify interior lines which need to be cut. Only cut interior lines which are marked red. All additional lines should be gently scored with your knife to make it easier to fold along the lines.
Note: the keyhole itself can be cut out entirely, instead of leaving tabs inside the cube. The flaps help stabilize the key inside the keyhole, but they can also make it more difficult to slide the key in and out. Specifically, I often cut off the rectangular tabs and leave the trapezoidal tabs. It all depends on how snug you want the pieces to fit.
Step Two
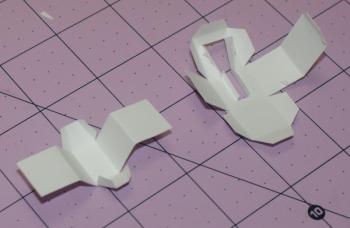
Fold each piece as shown below. Take note of the folds which are away from the score, and which ones are toward the score. In cases where you need to fold toward your score mark, it may be easier to fold away first, and then reverse the fold. Be careful with the creases near the keyhole; it's easy to bend the paper if you don't fold carefully.
Step Three
Glue the two pieces, placing glue on the outside of each tab and tucking it under the adjacent side. It may be tempting to glue multiple tabs at once, but you should resist that temptation (unless you're very experienced) and take it slowly. A badly formed edge will make your keyhole corner unusable. Also be sure to wipe away any excess glue along the corners on the key piece; a ridge of glue may make the keyhole unusable.

Step Four
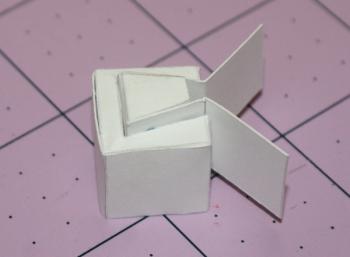
Once the glue is fully dried, gently slide the key into the keyhole, so it looks like the picture shown here. This may be a very snug fit, and you might be tempted to think it won't work. Pay attention to how you hold the keyhole piece; the obvious way to hold it is with thumb and forefinger on the sides adjacent to the keyhole. However, that squeezes the keyhole and makes it harder to slide the key in. Instead of holding it by the sides, place your thumb and forefinger on the edges behind the keyhole. If the key doesn't fit, look for places that may be catching, and use scissors or a knife to trim those areas. Once the key is in place, try taking it in and out several times to loosen the joint a bit.
Step Five
Place your two walls together with the assembled keyhole corner pressed into the corner. One of the tabs of the key should be tucked between the two walls, and the key should be facing up. Glue the two tabs of the key onto one wall. Once the glue is a little bit tacky so it holds on its own, carefully remove the keyhole so you can solidly press the key into place. Hold until the glue is well set.
Now place some glue on the side of the keyhole which will press againsts the other wall, slide the keyhole back onto the key, and press the wall against the glued surface. Hold this joint until the glue is set.
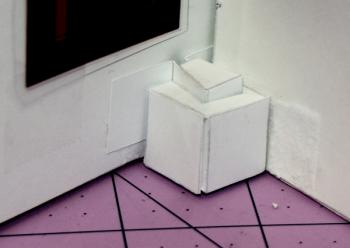
Note that you can put multiple keystone on a single wall. In the image above, there is a second keyhole at the top of the wall. Be sure both keys are facing the same direction, or you will make it impossible to detach the corner.

