Paper Craft: Tutorials: Textures: Wood Siding
Unlike stone and brick textures, which are very time consuming to create, wood siding is not only easy to do, but also relatively simple. Instructions for this basic texture are given below. We begin, as always, with the materials you'll need for this project.
Materials
Painting
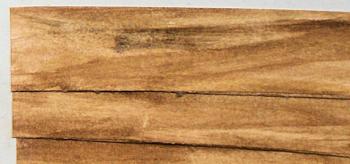
Take a sheet of ivory cardstock (you can use other base colors, or just plain white, but the pale yellow of this paper makes a great base for a wood grain) and paint it. You are not going to focus on individual wood grain streaks, because this is a very small-scale piece of wood you are representing. Instead, you're going to pick your color (for the image shown above I used burnt umber), dilute it well with water, and then cover the entire paper with that color. The nice thing about this process is, you don't have to be careful - in fact, being careful may very well ruin the effect. Spread the paint horizontally (in the direction of the wood grain). You can also wipe it with a paper towel to remove excess paint/water.
If you want a lighter grained wood, either dilute the paint even more, or try mixing burnt umber with yellow ochre. If you want a mahogany look, mix a little red with the burnt umber. Try out your color on a scrap of cardstock before painting.
Cutting
As your paper dries, you'll find that it curls significantly. You can try to flatten it with a heavy book, or by manually curling it the other way. If there's a little curl left, that's okay, because the glue will help it lie flat.
Decide on the width and height of your boards, and use your paper trimmer to create uniformly shaped rectangles.
In addition to cutting out the painted rectangles, cut out some additional rectangles of the same length, but about half the height. Fold these in half to make a very narrow but thick strip. This narrow piece will be used to make the bottom of each board (where it overlaps the one below it) stick out away from the surface.
Gluing
For each narrow strip, Glue the two sides together and then glue it to the back side of one of your board rectangles. Now each board will have a thin edge and a thick edge. The thin edge is the top edge, and the thick edge is the bottom.
Before you begin gluing the boards to the wall, mark off horizontal lines on the wall to show where to glue the boards. The distance between horizontal lines should be a little smaller than the height of the board, so the boards will overlap. Now, starting from the bottom of your wall, glue the boards on one at a time, with each board after the first one overlapping the one below.


