Paper Craft: Tutorials: Tips
This page provides some general suggestions for people beginning to build 3D models from cardstock.
-
Get good tools! Your project will come together so much more easily if you have high quality tools. We have a whole page of Recommended Construction Tools for you to peruse. You don't need everything on that page, so I will quickly mention the most important ones: a high quality PVA glue, a good craft knife, and a cutting mat. These are a must; the rest of the tools you will pick up, or not, depending on what kind of work you're trying to do.
-
Keep your workspace clean. This one is my own personal downfall. I enjoy doing a variety of art-related activities; drawing, painting, clay modeling, paper crafts - they all end up on my art desk at some point. And when I get deeply involved in one or more projects...who has time to clean off the desk? But if my desk gets crowded, I end up getting sloppy in my work because I'm always trying to push things out of the way. In addition to having more space to work, a clean table can actually be very inspiring mentally.
-
Your knife is not a pencil. Of course you already know that! So why did I tell you? Because when I started working with cardstock construction, building ornaments like this: dodecahedron ornament, I held my craft knife the same way I hold my pencil. I hold my pencil at about a 60 degree angle to the table. It was a happy little accident when I started holding my knife at a much steeper angle. I found that my lines were more precise, and it was easier to cut. The same may not be true for you, but you should not make the assumption that you ought to hold the knife the same way you hold a pencil. Experiment. Try different ways of holding it until you find something that works comfortably for you.
-
Score your folds. When you need to fold a piece of card stock, the best way to get a good fold is to carefully run your craft knife gently along the edge of your fold. That very light cut will allow you to fold the paper perfectly. It might take a bit of practice to score gently enough that you don't cut through the cardstock, but deep enough to make the fold easy. But it's worth whatever practice it takes, as it will make your projects come together so much more easily and precisely. After scoring the paper, always fold away from the score. Even if you need to fold toward the score, fold away first, and then reverse the fold.
-
Find the best cutting direction. When you are cutting with your craft knife, at what angle do you point the line you're cutting along? Are you cutting directly toward yourself? At right angles to your chest? Somewhere between? Try cutting at different angles to find what is most comfortable for you, because that's probably going to result in the straightest lines. For me, as a leftie, I find that I'm most comfortable if I'm cutting in the direction of my left elbow. When I'm cutting in this direction, the movement of my elbow doesn't affect the direction of the knife. If you want a little more help finding that special angle that works best for you, visit the cutting direction tutorial.
You'll find that there's a range of angles that is comfortable for you to cut at. For example, for me, I can comfortably cut with the cut direction aimed toward my elbow, or about 45 degrees to the left of that, or any angle between. This is important when it comes time to cut a curved line. You'll orient your paper so your knife starts aimed in the direction of your outer angle that's comfortable, and the curve of the line steers you toward the inner comfortable angle. This produces a very smooth arm motion that gives a very steady curve. Once you've drawn the knife along the curve until you reach that inner angle, it's time to stop, rotate the paper, and begin again at your outer angle. Once you get this rhythm down, you'll find that cutting curved lines is actually a very satisfying activity!
-
Cut everything carefully. That may seem like an obvious piece of advice, but let me explain why it's worth saying. Some of your cuts matter. They must be precise, square, and perfectly straight. Others don't matter because they don't control the three dimensional form of the object, and are hidden from view (example: the tabs you glue underneath a surface). The temptation will be to cut quickly and sloppily on the non-essential edges, and then cut carefully on the visible/form defining edges. However, what's likely to happen is that you'll get into "quick and sloppy" mode, and then realize - too late - that you stayed in that mode when you started making a more important cut. If that's your tendency, it's better to be careful and precise on all cuts, regardless of whether anyone will ever see it!
-
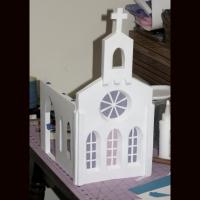
Use Temporary Adhesive. It's a really good idea to try putting your construction together with painter's tape first, before you start gluing it. This is especially important if you're creating your own designs. I'm currently building a church facade which is made up of 16 separate pieces of paper. If I get it 80% put together, and then discover that one of the pieces I attached with adhesive was incorrectly cut, I'm going to be very frustrated to see all that work go down the tubes. Tape first, see how it looks, and then replace tape with adhesive.
-
Find the best viewpoint. One of the wonderful things about the PVA adhesive I suggested above (aside from the fact that it's non-toxic) is its dry time. It takes longer than superglue to "hold" but not nearly as long as a cheaper glue like Elmers or Gorilla. So in most cases (unless there's tension on the pieces you're gluing), you can hold it in place by hand for about 20 seconds, and then, even though it's not dry it'll hold on its own. But this quick dry time means you have to be prepared when you join edges. For every pair of edges you join, there's typically several bad ways to hold it, and often just one good way to hold it. The "good" way is the viewpoint that let's you clearly both edges, so you can be sure they line up. Surprisingly, the best viewpoint is not always the most obvious one. Unless I consciously make myself hold the project at several different angles first, I'll end up gluing it without being able to accurately assess whether the pieces line up. Often what you will find is that the best view comes by flipping the project over after you apply glue.
-
Keep surfaces flat when gluing. Do what you need to in order to ensure that you don't have a bow in your surfaces. If one or more surfaces can be pressed against a flat surface (desktop, wall, etc.), you'll help to avoid warped surfaces.
-
One edge at a time. If you're like me, you may get impatient, and want to glue several things at once. But if you're using a good glue, it's not that much of a hassle to limit yourself to one edge at a time. When I'm gluing an edge, I use both hands to get that one edge perfectly lined up, and then I hold it with one hand while I use the other hand to wipe off any excess glue. If I was doing two things at once, I couldn't do that.
- Think three-dimensionally. Thinking three-dimensionally means thinking about depth. A wall is not a two-dimensional object, and neither is a roof. Nothing exists in two dimensions; every structural element consists of length, width and depth. Which means a wall is actually a BOX, not a flat surface. Sure, there are situations where you can get away with two dimensions, but your model will be both sturdier and more aesthetically pleasing if you make your design elements have depth.


