Paper Craft: Tutorials: Round Beveled Windows
If you have read the page on Beveled Wall Openings (windows), you might be tempted to think that round beveled wall openings are even more complicated. In fact, they're much easier.
I'm going to outline the geometry behind how we calculate the shape of our frame piece, and that explanation will comprise the bulk of this tutorial. If you're not interested in the background, you can just grab the three formulas (which are displayed in bold text) and then scoot down to the "Example" section, where you can see the formulas used.
Width of Frame Piece
One of the key things to remember is that if the depth of your wall is d units, then the width of the beveled window frame is going to be slightly more than d units. How much more depends on the amount of bevel.
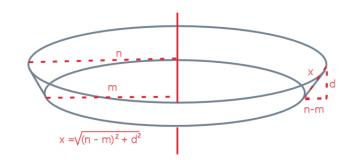
Let's say that your circle opening's inner radius is m units, and the circle opening's outer radius is n units, and the wall depth is d units. Then we can form a right triangle with one leg of length (n - m), and the other of length d. The width of your frame is the hypotenuse of that right triangle, or x = SQR((n - m)^2 + d^2).
For example, if the inner radius is 8 units and the outer radius is 11 units, and the depth is 4 units, then the width of the frame is SQR((11 - 8)^2 + 4^2) = SQR(9 + 16) = SQR(25) = 5.
Arc Radius
The next thing you need to know is that the shape of the piece you create will be circular in shape. We need to use the information we have to find the inner and outer radii of that shape. It's tempting to think that the radii will be the inner and outer radii of the opening, but it's not that simple. You need to picture a very large circle with a line cut from center to edge, and then rolled to make a cone. The base of that cone will be the larger edge of your opening.
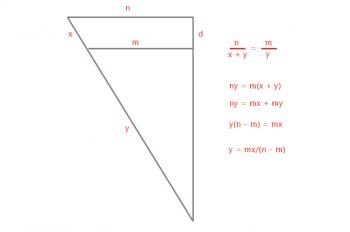
The diagram here shows the similar triangles which can be created using the radii of the edges, the height, and the slant height of the cone. From these similar triangles, we can deduce that the slant height to the inner radius is y = mx/(n - m).
Arc Angle
The last complication is...how much of this ring are we going to use? Remember that this is the bottom of a rolled-up cone, so we don't need the entire circle. One way to deal with this is to simply roll up your circle and mark on it where it needs to be cut to fit within the frame. A more mathematical approach is to recognize that the ratio of the circumferences of the cone and the outer circle is the same as the ratio of the radii. In other words, n/(x + y) is the fraction of the circle we need. So if we take 360 and multiply it by n/(x + y), we have a protractor reading which we can use to mark off how much of our circle we need. A = 360n/(x + y).
Example
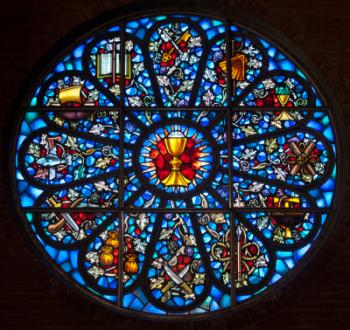
For my example, I'm building a rose window for a church model. The inner radius is 11 units, the outer radius is 13 units, and the wall depth is 4 units. Thus, m = 11, n = 13, and d = 4.
x = SQR((13 - 11)^2 + 4^2) = SQR(4 + 16) = SQR(20) = 4.5 units
y = 11(4.47)/(13 - 11) = 24.6
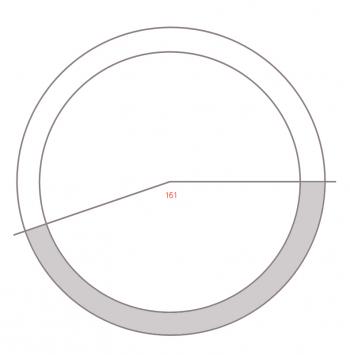
A = 360(13)/(4.5 + 24.6) = 161 degrees.
Thus, I mark the center and set my compass to 24.6 units and draw a circle. Then I set my compass to 24.6 + 4.5 = 29.2 units and draw a second circle from the same center point.
Finally, centering my protractor at the circle's center, I mark off 161 degrees. This is how much of the circle I need. The diagram below shows what the piece looks like, shaded gray.
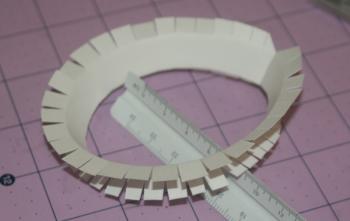
The only thing remaining is to create the tabs that will glue to the wall, and the tab that will attach one end of the piece to the other. These tabs can be drawn with a compass anchored at the center point you used before, but they can also be hand-drawn since they are hidden from view. Draw a partial circle on the outside of your piece, and a partial circle on the inside (these should be wide enough to glue and attach), and extend one end enough to wrap it around the other end and glue it.
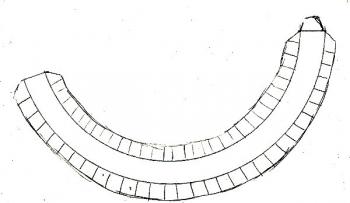
Note that the rounded tabs are sliced into small pieces. This is because, when the tabs are splayed out, the shape is actually a series of plane surfaces whose sizes are determined by the widths of the tab slices. The smaller those tabs are, the more closely your piece will approximate a circle.
Before you glue the piece into the wall opening, glue the tab at the end to help the piece hold its shape (see image below). It will look more pear-shaped than circular; this is because the piece is weakest at the point where the two ends are joined together. When you glue the tabs to the interior of the wall, start with this weak point and work around to the other side. You can also strengthen that point by gluing a small uncreased piece of paper to both sides of the joint so it wraps around the joint and keeps it from creasing there.